Monday, October 31, 2011

Monster bookmarks and Halloween goody bags

My oldest son, Daniel, and I decided to make some Halloween goody bags for his class. They ended up taking a lot longer than we expected, but the ended up turning out great!

I had found these really cool, fun bookmarks on pinterest...here, and am so glad we tried them! They turned out amazing!!

Here are the bookmarks:


And here are the finished goody bags:

Daniel and I had a lot of fun putting these together!! His class just loved them!! I am entering these into The Paper Variety's current challenge...create a cute or spooky Halloween project!!

For the bookmarks, I used:
  • The Paper Studio cardstock
  • The paper Studio pp
  • scissors, glue and circle cutter
For the Goody bags, I used:
  • The Paper Studio, patterned paper
  • Stampabilities stamps
Thanks for stopping by!! 


Up in the clouds

Hello, Hello!!! :D

I did a layout this weekend for Creative Scrappers sketch 178. When I saw the sketch, it just clicked in my head that I wanted to do these photos of Daniel flying a kite. The sketch had flowers, and I thought clouds. It came together so well, I am really happy with it! :)


Here is my layout:

Here is sketch 178:
And, as always, some detailed photos:


For this layout, I used:
  • DCWV cardstock(glitter)
  • Colorbok cardstock
  • MME Limetwist, patterned paper
  • The Paper Studio ALPHABET puffy stickers
  • The Paper Studio Glittered Alphabet stickers
  • Making Memories puffy alphas
  • Bella Blvd Mr. Boy, cardstock stickers
  • MME Limetwist, cardstock accessories stickers
  • twine
  • buttons
Thanks so much for stopping by, and have a great day!!


Merry Christmas card

Hey all!!

Well, I didn't make the next round of Practical Scrappers card contest, but I still want to share my card with you!!

I absolutely loved my card and thought I went out of the box with the requirements!!

For this round, we were to make a card with dry embossing and "rainbow". It didn't have to be an actual rainbow, just rainbow colors/strips on the paper.

Here is the card I came up with:
  Thanks to everyone who voted for me!! I am really honored to have made it as far as I did!! The top 5 look great, you should head over and cast in your vote...here!

For this card, I used:
  • The Paper Studio cardstock and kraft paper
  • The Paper Studio pp
  • MME pp
  • DCWV pp
  • scrap pp
  • Prima pearls
  • Buttons, Galore and More buttons
  • twine
  • TH embossing folder
  • Stampin Up, Basic Black ink
  • Stampin Up, Merry Christmas stamp

Have a great day everyone!!! :D


Thursday, October 27, 2011

Fave at Sketchy Thursdays!

Yay! My layout, Our new puppy Thor, was selected as a fave at Sketchy Thursdays for sketch 10.20. Always exciting when you get news like that! Makes me happy!!! :D


Thanks so much Sketchy Thursdays!!


Tuesday, October 25, 2011

Our new puppy Thor

Hi all!!

I made a layout for Practical Scrappers Challenge Me Tuesdays: Pets.

Here is the layout I came up with:


I used the current sketch at Sketchy Thursdays (10.20):


Here are some detailed photos:


The journaling reads:
        "When we took the boys to have their yearly pictures, they had to take their new puppy, Thor. He sure didn't want to pose, but both boys got to pick a spot they wanted to take a photo with him at. Thor was a trooper and did really well! I feel a new yearly tradition starting! Cann Memorial Gardens, Ponca City, OK"

This was a really fun layout to make!! I just loved the photos and new what I wanted to do once I saw the sketch!!

For this layout, I used:
  • The Paper Studio: cardstock, pp, chipboard alphas
  • Spareparts by TPS: bone brads
  • AC Thickers: Poolside, Stroll, Rootbeer Float
  • Jolee's by You: dimensional stickers, paws
  • Tim Holtz idea-ology: Philosophy tags
  • Ribbon Trends: woof ribbon
  • Buttons Galore & More: button
  • twine
Thanks so much for stopping by, and have an amazing day!!! :D


Monday, October 24, 2011

I made top 5 at Sketchy Thursdays for November Guest DT!!

So excited that I made the top 5 at Sketchy Thursdays GDT! All the layouts are amazing!! Can't wait to see who wins (hopefully me!! lol)

Head over and check it out...and vote!!! :D
VOTE! November Guest Design Team Member


Friday, October 21, 2011

Fun at the Pond

Happy Friday everyone!! This weeks Frosted Designs Fabulous Friday Challenge is a fun one!! It's a color challenge!! They are warm, rich fall colors...LOVE!!!

Here is the layout I came up with:


Here is the challenge photo/colors...


I used the current sketch at PageMaps for my layout. Here is the sketch:


And here are a few close-ups:


I really hope you will head over there and play along!!! Its such a fun challenge, and I would love to see what you all create with it!! :D

For this layout, I used:
  • The Paper Studio Kraft paper and Cardstock paper
  • MME, Where the Heart is...patterned paper
  • MME, Lost and Found patterned paper
  • glass beads
  • scrap ribbon
  • twine
  • Tim Holtz distress ink and memo pins
  • Buttons Galore and More, buttons
  • Bella Blvd, Mr. Boy border stickers and chipboard stickers
  • 3 Bugs in a Rug, cardstock sticker
  • MME, Limetwist Fly A Kite alpha stickers
  • Crate Paper, Toy Box Collection cardstock stickers
  • SPAREPARTS by The Paper Studio, brads and bottlecaps
  • The Paper Studio, chipboard alphas (brown)
  • Stick-A-Bilities by The Paper Studio, green alphas
  • Making Memories, puffy alphas (red)

Thank you so much for stopping by, and have an amazing weekend!!


Wednesday, October 19, 2011

my family {Sketchy Thursdays Nov GDT}

Hello everyone!!

I decided to do the November Sketchy Thursdays Guest DT challenge this month!! It was such an awesome sketch and challenge!!

Here is my layout for it:


Here is the sketch:
And the challenge was to
  1. list what you are thankful for, and
  2. use at least 5 leaves, in some sort of form
The things I am thankful for are listed in the label holders...they are:
  • Saturdays
  • coffee
  • books/reading
  • scrapbooking everyday
  • fall boots, sweaters and nail polish
  • chocolate, chocolate & more chocolate
But none of that would even matter if I didn't have...my family!! (insert....awwww!!) hehehe

Here are some detailed photos:


For this layout, I used:
  • Colorbok cardstock
  • EchoPark, For the Record p.p.
  • Crate Paper, Portrait Collection, p.p.
  • MME, Limetwist p.p.
  • AC thickers, Delight & Cinnamon
  • Echo Park, For the Record alpha stickers
  • Making Memories, shimmer alphas (#s)
  • SpareParts by The Paper Studio, label holders & brads
  • GEMSTONES by TPS
  • twine
  • burlap
  • fabric trim leaves(I cut them out individually)
Thanks so much for stopping by, and have a great day!!


Tuesday, October 18, 2011

Sweet baby girl

Hello everyone!! Hope you all are having a great week so far!! :D

I have a layout today that I did for Creative Scrappers sketch 177 and ScrapFIT weekend warmup 16: Bright and Bold colors. I did a layout of my niece, Arin...

Here is my layout:

Here is sketch 177:

Here are some detailed photos...


For this layout, I used:
  • Bazzill cardstock
  • The Paper Studio cardstock
  • Echo Park, A Walk in The Park patterned paper
  • Echo Park, For The Record patterned paper
  • Momenta (atd Vibrant paper pad, old) patterned paper
  • American Crafts, remarks dimensional stickers, Etiquette
  • PEARLS, The Paper Studio
  • Cosmo Cricket, cardstock stickers, sweet spring
  • The Paper Studio, chipboard alphas
  • twine
  • doilies
  • stampabilities ink
  • GEMSTONES by The Paper Studio
Thanks for stopping by! Hope you enjoyed my layout and I hope you have a fabulous day!!!

♥Much Love♥
      Jenny

Saturday, October 15, 2011

Practical Scrappers Cardmaking Contest: Round 3

woohoo!! Made it to Round 3 of the cardmaking contest over at Practical Scrappers!!! :D  Please head over and vote for me everyday!!! You can vote for ONE card a day until Oct. 20th. I will give you a link....here!

Thank you to all who have been voting for me!!! It means more than you know!!!

Okay, for Round 3, we were to make a card with flags or banners. Here is my card:

Alot of the contestants went with Halloween last week, so I thought I would tackle it this week!  This card really started taking over on its own, lol. I had  a different card planned out, but this just started happening and I went with it!  I am sooo happy with the way it turned out!! My boys especially like it, lol! But, Halloween is one of their favorite holidays!

For this card, I used:
  • Colorbok cardstock
  • Bazzill cardstock
  • MME pp
  • The Paper Studio pp
  • Prima pearls
  • The Robert Stanley Collection, ribbon
  • twine
  • Stampabilities: Skull And Crossbones stamp & Happy Halloween stamp
  • Stampin Up, Basic Black dye ink
  • The Paper Studio Embossing folder, Ornate Flourish
Thanks again to all my amazing supporters!!! Keep it up, lol!!!! Love you all!!

♥Much Love♥
       Jenny

Friday, October 14, 2011

my little blue ball

Hi everyone!!

I did this layout awhile back and never got it up!! This one is of my cute, little Jacob when he was year old.

I used sketch #176 from Creative Scrappers...

Here are some detailed photos:


Sorry for the bad photos...had some issues with lighting on this one...

I really love the way this layout turned out! It is definitely one of my new faves!!

For this layout, I used:
  • Colorbok cardstock
  • EchoPark, A Walk in the Park, pp
  • My Mind's Eye, Limetwist, pp
  • Echo Park, A Walk in the Park, banner stickers
  • American Crafts, thickers
  • Bella Blvd, Mr. Boy, stickers
  • The Paper Studio, Bubble-A-Bilities, arrow
  • Echo Park, Little Boy, journal tag and fussy cut airplanes
  • Buttons, Galore & More, buttons
  • twine, from a prize I won
Thanks so much for stopping by, and have a wonderful day!!

♥Much Love♥
      Jenny

Wednesday, October 12, 2011

4 Years Down, A lifetime To Go!

So we have made it to the 4 year mark!! Yay!! (Well, this summer we did, but I am finally scrapping the photo!! hehe) Our 4 year wedding anniversary was in June, and my oldest was a sweetheart and snapped a photo for us! I decided to go with The Color Room's current color scheme and make a layout...

Here it is:

Here are is The Color Rooms current challenge(#79):

And here is the sketch I used (Frosted Designs Sketch Along Tuesday sketch #25):

Here are some closeups:


Don't you just LOVE those super-duper awesome flowers??? I found those on Pinterest....here.  I thought they were the cutest thing ever and had to put some on a page!!

For this layout, I used:
  • Bazzill Bling cardstock
  • The Paper Studio Kraft cardstock and regular cardstock
  • MME pp
  • Colorbok pp
  • MME Breaking Free cardstock frame
  • wedding ribbon
  • Prima Say it in Crystals black swirls
  • Authentique Diction
  • Colorbok Woodhaven, foil stickers, Ransom
  • Making Memories mini shimmer alphas
  • Affinity by the Paper Studio chipboard stickers, Cream Chip Glitter Alphas
  • Buttons, Galore & More buttons
  • butterflies from a friend...
Okay everyone, thanks for stopping by and have an amazing day/night/morning/afternoon!!! :D

Much love,
Jenny♥

Sunday, October 9, 2011

Frosted Designs Show Me Sunday Tutorial: Halloween "eek" frame

Hi everyone!! Thanks for stopping by and checking out my tutorial!

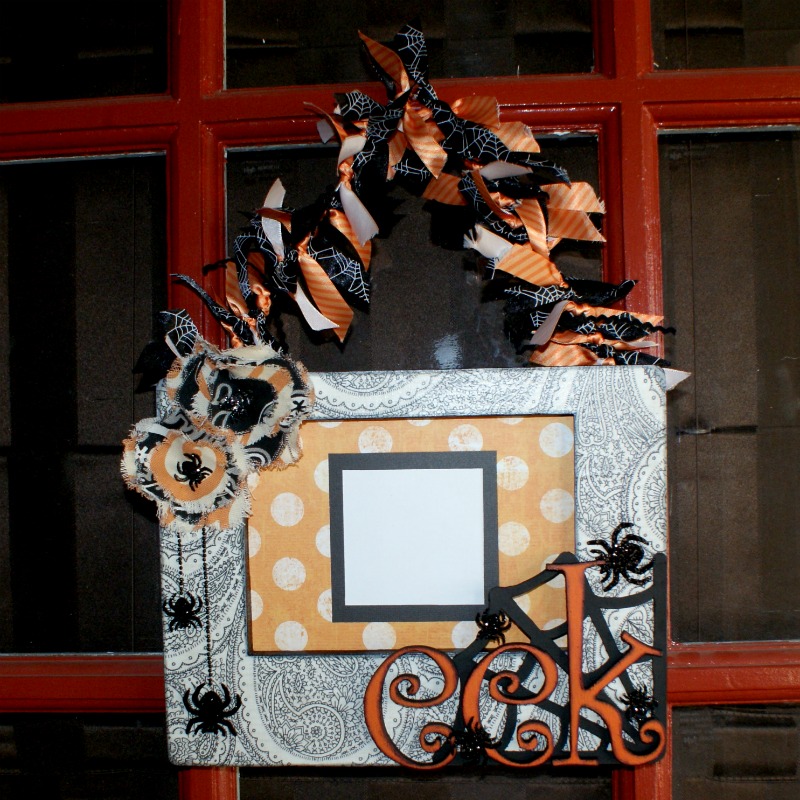
Today I am going to show you how I made my "eek" Halloween hanging frame.


These are the things you will need:


  •     wooden frame
  •     acrylic paint, black and orange
  •     foam and paint brushes
  •     patterned paper
  •     cardstock
  •     Mod Podge
  •     ink
  •     wooden letters
  •     chipboard
  •     canvas fabric
  •     spider stickers
  •     needle and thread
  •     black pearls
  •     picture wire
  •     staple gun
  •     ribbon


 I used a foam brush and did a quick 2 coat over the outside and inside of the wooden frame. After I let it dry, I used the frame as a stencil and traced the face/front shape onto my patterned paper. I used my paper trimmer and cut it out. After some trimming down to the appropriate size, I used my Tim Holtz Distress Stain in weathered wood to ink the inside and outside paper edges. (You don't have to use this particular ink, any ink pad in the color of your choice would work, but these little guys are awesome!!) I then Mod Podged the pattern paper to the frame per bottle instruction. I gave it two coats.


I hand drew my flower layers onto the back of the canvas fabric, and then cut them out. I alternated the patterns/layers. The larger flower layers start at about 3 inches and go down to about 1 1/2 inches. The smaller flower layers start at about 2 1/2 inches and go down to 1 1/2 inches. To fray the flower edges, I took the flower layers and just started tugging, wiggling and pulling at the edges, loosening the threads until they were to my liking.


After all the flower layers were frayed,  I laid them on top of each other and rotated them until they looked the way I wanted them to. I then folded them in half, inward and vertically, and put 2 stitches through the fold, close to the edge. I then folded the layers horizontally and gave them another stitch or two. This is what gives them their dimension. I used some pop-dot adhesives on my spider stickers so they would stand out.


For the spider web, I hand drew my web onto a piece of chipboard, and used my craft knife to cut it out. I then painted it black with 2 coats of acrylic paint. The web is roughly 4 1/2 inches by 4 1/2 inches. (If you have a die cut spider web, that would work, too. I didn't have one that I liked for this project, so I chose to hand draw and cut out.)


For the letters, I painted them black using a small paint brush to get into the small curves of them. After 2 coats, I painted the face/front of them with orange acrylic paint. You will have to paint multiple coats of orange onto the letters, just be sure to let the paint dry in-between each coat. After they are dry, ink the edges of the letters with some black ink. I used just a basic black water based ink for mine. Depending on the tools/supplies you have, you may need to get creative to get the curved parts of the letters inked. For example, I had to used a Q-tip on mine.


After all the parts were done, I adhered it all together. I added the black pearls and spiders to the left side, and also added some spiders to the web. I also cut and added the pattern paper and black cardstock matting (I matted to a 3x3 square), cut the picture wire and stapled each end to the back side of the frame. I then cut 3 1/2 - 5 inch strips of ribbon and tied them to the wire alternating between each ribbon. I also added a few pieces of ric-rac randomly through the ribbon. And there you have it!

I hope you all enjoyed learning how to make this fun, cute Halloween hanging frame! I would love to see what you create based on this tutorial!! Link me in a comment, and I will head over and check it out!!
Thanks everyone, and have an amazing day!!

Much love,
Jenny♥